Sunday, April 20, 2025

Recruiting - Apply Flow or Job Application Flow

 An Application flow is a sequence of steps that must be completed by a candidate when applying for a job or when submitting a profile on a Career Section/Site. 

Application flows are also used by referrers, recruiters, hiring managers, and agents to enter candidate profiles, invite candidates to apply for a job or enter information on behalf of candidates.

Where actually we use this flow?

While creating job requisition, we must specify job application flow in the External Application flow.


We have diff types of Application flows such as Job Application Flow, Talent Community Flow and Request Information Flow.

Navigate to FSM Area and search for task Job Application Flow Configuration

Click on Save and Continue. It will enable us to create a Version for Job Application Flow. At least one version is required to create.


Legal Disclaimer, E-Signature, Campaign Opt-in, One Page Application Flow, Job Alert Opt-In and Express Apply: all these can be modified/reconfigured as per requirement in Recruiting Content Library as below.

Navigate to FSM Area, search for Recruiting Content Library and filter as shown below.


Click on Job Application Legal Disclaimer, it will open description and content item details. Click on Actions and choose create content item with copy version.


Similar to above we can filter for Job Application E-Signature Statement to modify.


We have options to change the section names like shown below.


Once all these changes/activities are completed, activate the Job Application Flow with the code. While creating requisition, choose Job Application Flow as shown below


Submit the requisition. 

Open the requisition, the status now will be as Job Format - In progress. 

Click on Actions and then on Move to Posting. Requisition status now as Open-Posted as shown below.


To apply for the job requisition, we should navigate to Career site and search for Job Requisition which we posted. If that's not visible at Career Site, we need to run the processes.


As soon as processes are successfully completed, we will be able to see the Job Requisitions at Career Site.


Click on Job Requisition and then click on Apply Now button.


As soon as you click on Apply Now, we will get Legal Disclaimer as Terms and Conditions. We can notice here the changes that we made at Application Flow.


Complete filling application with required information and click on Submit.


Saturday, April 19, 2025

Processes to Run After Requisition Creation in ORC

In Oracle Recruiting Cloud (ORC), after creating job requisitions it’s important to run two key processes to ensure everything is properly set up for candidate visibility and search in the Career Sites (Internal/External).

The first one, "Maintain Candidates and Job Requisitions for Search," refreshes the search index so that newly created requisitions and candidate data are discoverable through keyword searches. This process is essential for recruiters to find and manage requisitions efficiently. The second process, 

If this process is stuck and continuously running in the environment, please refer to Document 2799848.1

"Publish Job Requisitions," makes the job postings visible on the career site and other external job boards, depending on how you've configured the system. Without running this, your requisitions may stay hidden from potential applicants. Running both ensures your jobs are searchable internally and accessible to external candidates.

Maintaining Oracle Search for Oracle Recruiting:

Oracle Search is the default search engine for new and existing customers of Oracle Fusion Cloud Recruiting. Oracle Search needs to be maintained after an upgrade or Production to Test (P2T) or Test to Test (T2T).

With Oracle Search, these features become available:

Recruiters and hiring managers can find candidate profiles using advanced search filters and boolean expressions.

Recruiters and Hiring Team members can see candidates that they're responsible for when the Candidate Security for Candidate Search is enabled.

External candidates can see similar jobs when searching for jobs.

External candidates can search for jobs using a postal code.

External candidates can explore jobs using a map view.

External candidates can see the distance between their selected location and the job location.

External candidates can use the Work Location, Organization, and Job Requisition filters.

External candidates can see job requisition flex field values exposed by recruiters.

Publish Job Requisitions:

Publishes or removes job requisitions based on a start date and end date. It also verifies if the automatic un-post condition is met.

For more scheduled processes in Recruiting Cloud, please refer Scheduled Processes in Oracle Recruiting Cloud

Friday, April 18, 2025

Recruiting - Career Site Configuration

Career Site is also called as Career Section in ORC. Oracle has given built-in Career sites which we can modify when customer is okay with available sites, and we can even customize those sites.


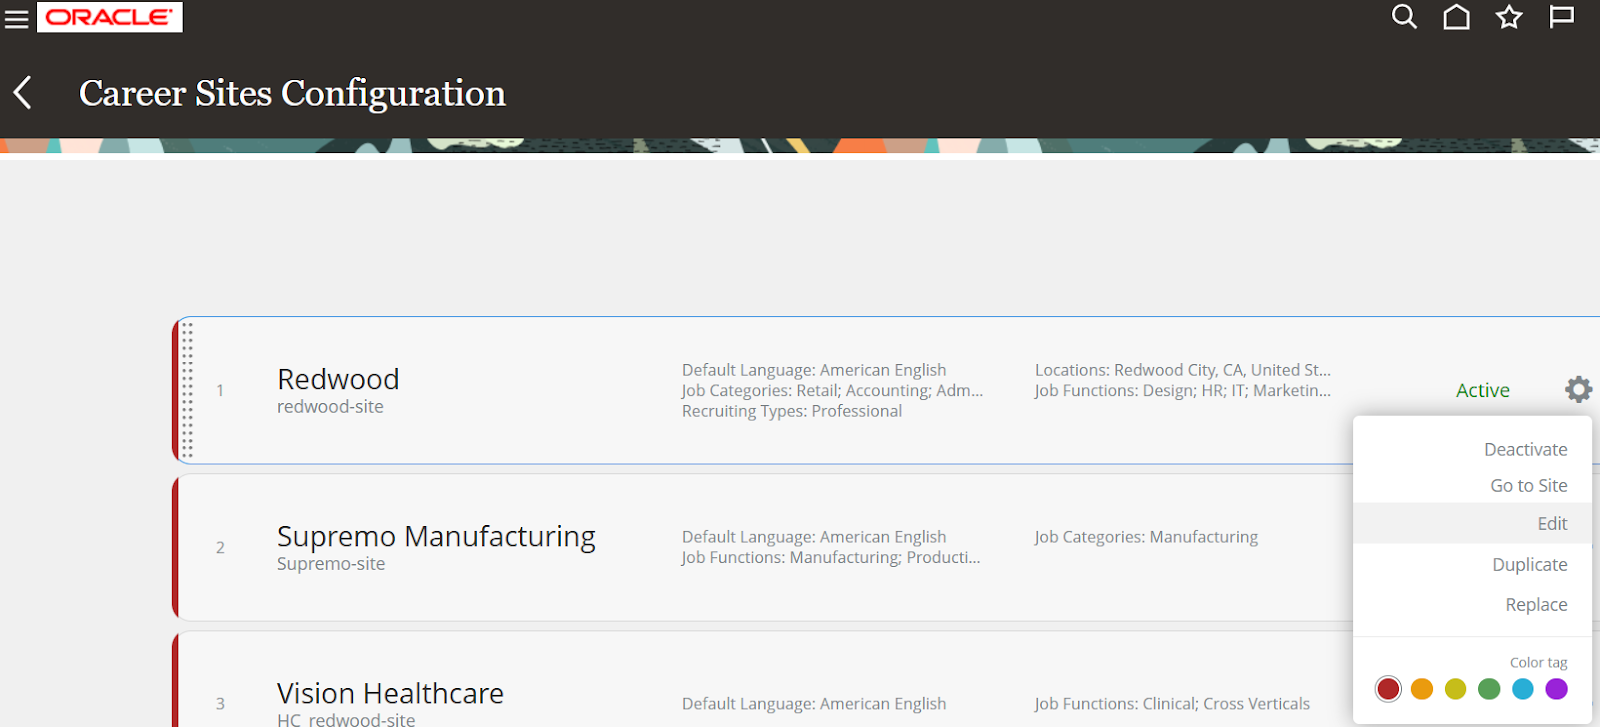
Login to Fusion Applications, navigate to Career Sites Configuration task. We can edit the same site, or we can create a copy by clicking on Duplicate option to modify the newly created one.


We can even Import available template designs from below. 

We can create a career site by duplicating Redwood then we will modify the copied one. As mentioned above, click on Duplicate end system will create a copy of that. Then on the copied one, Click on Edit.

General Section:

Modify the Site Name, Site Code, Site DisplayName etc. 


We can restrict Jobs in the Career Site to specific Locations, Organizations, Job Categories, Job Functions and Recruiting Types.

In ORC, Locations will come based on Geography Hierarchy Structure, Geography Hierarchies and Geographies. Only one Geography will be in active. 

Organization will be based on Organization Tree specified in Enterprise Recruiting and Candidate Experience Information as shown below.


We need to exclusively define Geographic Hierarchy Structure for Oracle Recruiting. 

Themes: 

In this section, we can customize all available. 


Pages: 

We can add as many pages as require.


Like above we can add custom widgets, refer to Asset Library for available images and Translations for site translation to other languages which we selected in General section.

Once all changes are completed then we can click on Publish Site to publish. You can notice custom branding image added here.


Once Career Site is sign-off by customer, we can migrate it to another environment using below option from FSM Environment. 

Export option to export the career site configuration and Import option to import configuration to another environment.


HDL Query to Delete Action Reason Usages in Fusion HCM

SELECT data
FROM (
SELECT 'METADATA|ActionReasonUsage|ActionCode|ActionReasonCode|StartDate|EndDate|SourceSystemId|SourceSystemOwner' data, 1 DATA_SEQ
  FROm DUAL
UNION ALL
Select 'DELETE|ActionReasonUsage|'
||
paru.action_code
||'|'||
paru.action_reason_code
||'|'||
to_char(paru.start_date, 'yyyy/mm/dd')
||'|'||
to_char(paru.end_date, 'yyyy/mm/dd')
||'|'||
hikm.source_system_id
||'|'||
hikm.source_system_owner data, 2 DATA_SEQ
from 
hrc_integration_key_map hikm,
PER_ACTION_REASON_USAGES paru
where 1=1
and paru.ACTION_REASON_USAGE_ID = hikm.surrogate_id
--and paru.created_by <> 'SEED_DATA_FROM_APPLICATION'
and paru.action_reason_code in (
<<List of Action Reason Codes>>
)
)
ORDER BY DATA_SEQ

Thursday, April 17, 2025

How to Automatically Submit HDL Files from HCM Extracts with Payroll Flows

Navigate to My Client Groups > Data Exchange

Click Extract Definitions.

Click on “+” icon to create the extract


Create the Auto Load parameter, for the HCM Data Loader end-to-end flow to work.


Click Design, create Root Data Groups, and add the necessary Data Groups based on your requirements. In this example, I am updating the FTE value to 1 for an employee.


Add the necessary attributes, including AssignmentId, PersonId, EffectiveStartDate, EffectiveEndDate, EffectiveSequence, EffectiveLatestChange, and any other required fields based on your data structure.


To update Assignment FTE, you need to retrieve WorkRelationship, WorkTerms, Assignment, and WorkMeasure. These entities ensure that employee assignment details are correctly mapped for data extraction and updates.


After entering all the required Data Groups, the extract can be validated to ensure accuracy. Once validation is successful, you can proceed with formula generation and compilation to finalize the setup.


Since this is a changes-only extract, one attribute must be designated as the Key attribute to uniquely identify each record. Additionally, for each record, the necessary columns should be selected and marked as change attributes to ensure that only modified data is extracted and processed.


Click Done, then submit the extract. Once processed, the system will generate XML data for review and further actions.


Create an eText Template to format the extracted data in HDL format for Assignment Work Measure FTE. Ensure the necessary attributes are mapped correctly to generate the required output.


Copy globalReportsDataModel to custom path. Create reports upload those 2 reports.


Navigate to Extract Definitions and define two delivery options as we have two different reports.


The above 2 delivery options to verify the data whether there are any issues.

Submit the extract to verify these reports. 


 Verify the results on Extract run successful.


Download and verify those Worker and Salary files.

Now, define delivery methods as Data Load Interface to submit HDL through the extract. Set up one delivery method for the Worker HDL file and another for the Salary HDL file to ensure accurate data processing.


Validate the extract if you have navigated to the Design area. If not, proceed to the next step without validation.

To automate the HCM Extract process with Data Load, create a Payroll Flow that seamlessly integrates extraction and loading. Define the flow with necessary parameters, ensuring smooth execution of HDL submissions within the payroll cycle.

Navigate to Refine Extracts, Click on Actions and create.


In the Activities section, select HCM Extract and Preparations to configure the extraction process.

The list of tasks will be displayed on the left side under Available Tasks. Select the extract you created, run the Data Loader Process, and then click Next to proceed.


Ensure that all processes are arranged in the correct sequence, then click Next to proceed.


Adjust the sequence if needed to ensure proper alignment, then click Next to continue.


Here, we will select and add extract parameters. Default or calculated type of values we can configure here.


 You can add the three parameters using Select and Add, as they are available as Extract Parameters. Ensure they are correctly mapped for accurate data processing.

 Configure the Task Parameters:

Click Next to navigate to the Task Parameters page.

Select the MAB FTE Update HCM extract record.


3.     Update the Effective Date parameter, setting the Basis Value to Effective Date. This task parameter will now accept the value of the Effective Date parameter from the payroll flow.


4.     Update the Auto Load parameter, ensuring the Parameter Basis is Bind to Flow and setting the Basis Value to Auto Load. This task parameter will now accept the value of the Auto Load parameter from the payroll flow.


5.     Update the Process Configuration Group parameter, ensuring the Parameter Basis is Bind to Flow and setting the Basis Value to Process Configuration Group. This task parameter will now accept the value of the Process Configuration Group parameter from the payroll flow.


6.       Update the Start Date parameter, ensuring the Parameter Basis is Bind to Flow and setting the Basis Value to Start Date. This task parameter will now accept the value of the Start Date parameter from the payroll flow.


7.       Select the Run HCM Data Loader task in the Tasks table. 

          Click Next to navigate to the Review page and click Submit.

          Search for your new payroll flow task and click Edit.

          In the Tasks panel, click Go to Task on the Run HCM Data Loader task.

          Edit the Extract Process Flow Name parameter ensuring the Parameter Basis is Bind to Flow Task and setting the Basis Value to MAB FTE Update, Submit, Payroll Process.


          Click on Submit and Open the flow definition, Go to Review the details and submit.


      Payroll flow is created now. We can submit from Payroll à Submit a Flow in the Data Exchange area. Click on Submit a Flow.


     Search for the Payroll flow that we created i.e. MAB FTE Update Inbound Extract


Click on the flow, enter parameters and click on Submit.


Monitor the flow and verify for successful run.


Click on Run HCM Data Loader task to see the file submission to Import and Load area.


On the successful file Import and Load, we can see the task as Completed.


Source: Initiate HCM Data Loader for HCM Extract Generated Files